Setting up the Facebook conversion API in the AI Commerce online store
In this article, we provide instructions for setting up the Facebook Conversion API. The Conversion API enables direct data transfer between your online store and Meta channels, such as Facebook and Instagram, which improves the effectiveness and measurement of advertising campaigns across all Meta platforms.

Lauri Koskensalo
Head of Growth
3
my reading time
11.1.2025
• Improve Data Accuracy: The API connects your online store's data directly to Meta's services without browser limitations, reducing the loss of tracking information due to issues like cookie blocking.
• Enhance Ad Targeting: The Conversion API provides more comprehensive information about customer behavior, helping to create more accurate and personalized advertising campaigns.
• Optimize Conversion Tracking: Tracking events such as purchases and registrations is more accurate and reliable.
• Improve Privacy: The API allows for management and transfer of data in a secure manner without compromising privacy.
• Increase Results with Advertising Budget: Better data leads to more effective advertising optimization and higher ROI.
Start the Conversion API integration from the following URL:
https://business.facebook.com/events_manager
Then follow the instructions presented in the screenshots to set up the Conversion API in your online shopping solution.
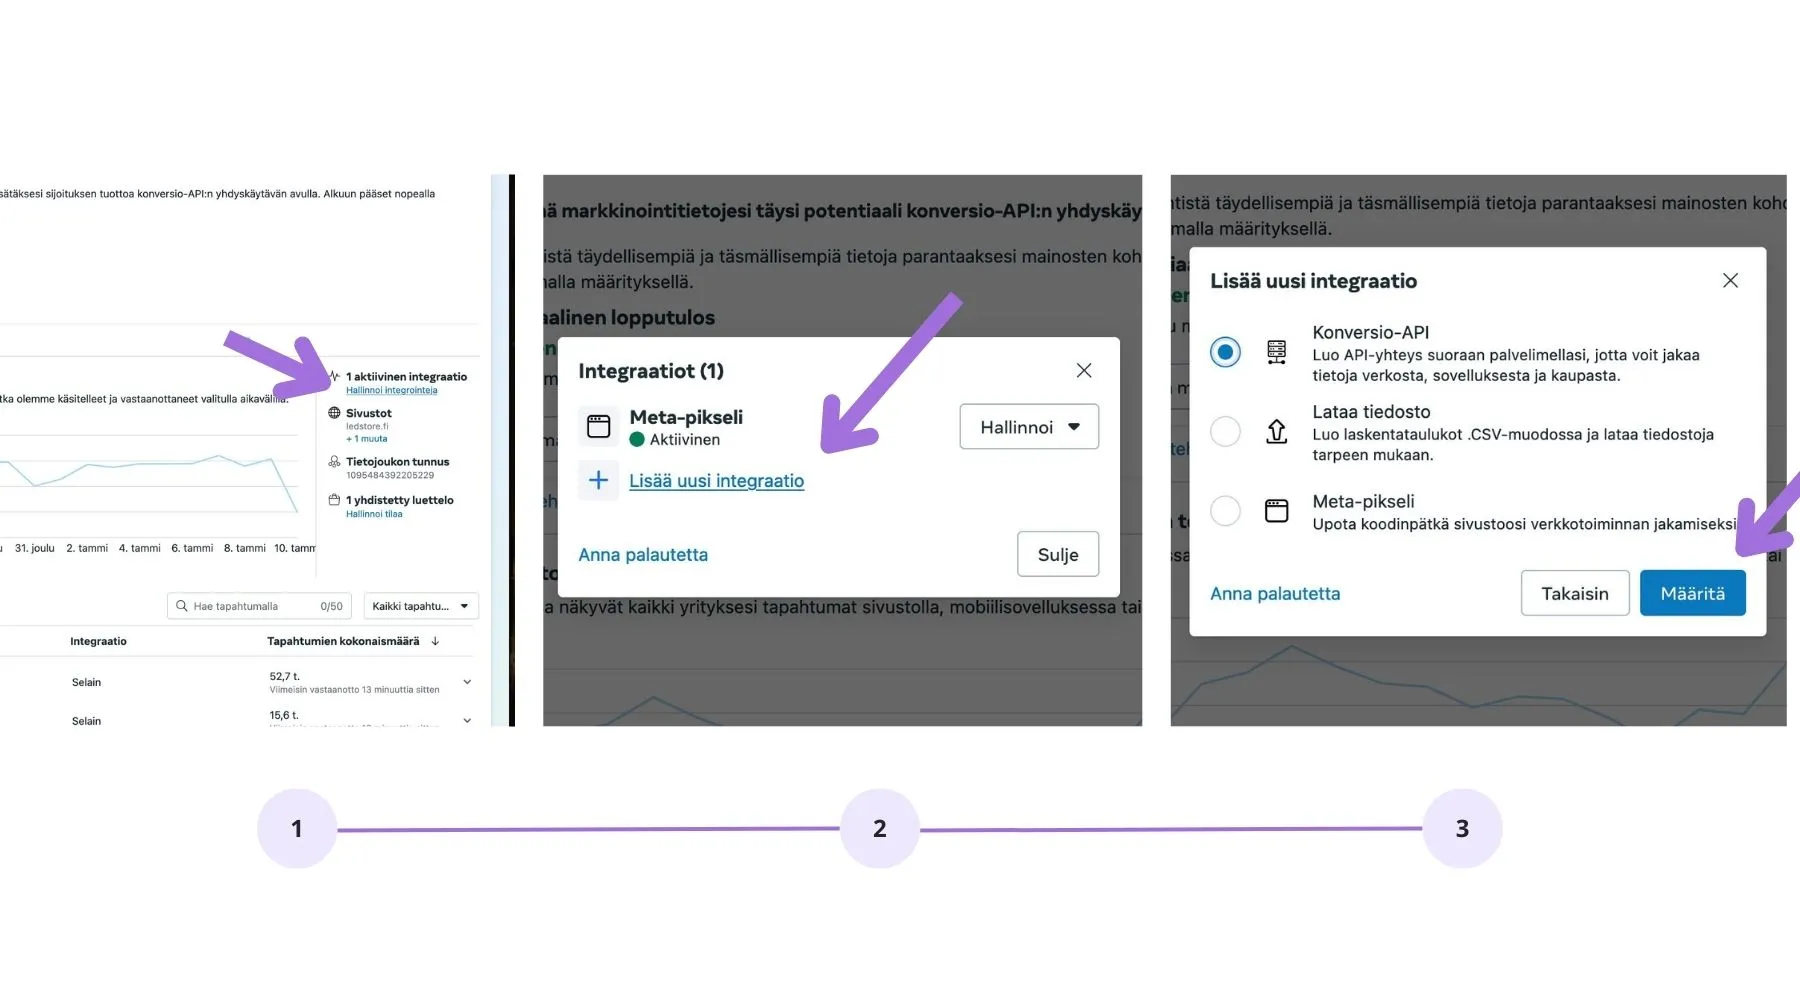
Step 1: Add a New Integration in Facebook Business Manager
Go to Facebook Business Manager and open the Events Manager section.
Select your website where you want to add the Conversion API.
Click Add New Integration and select Conversion API.
Click Set Up to continue.
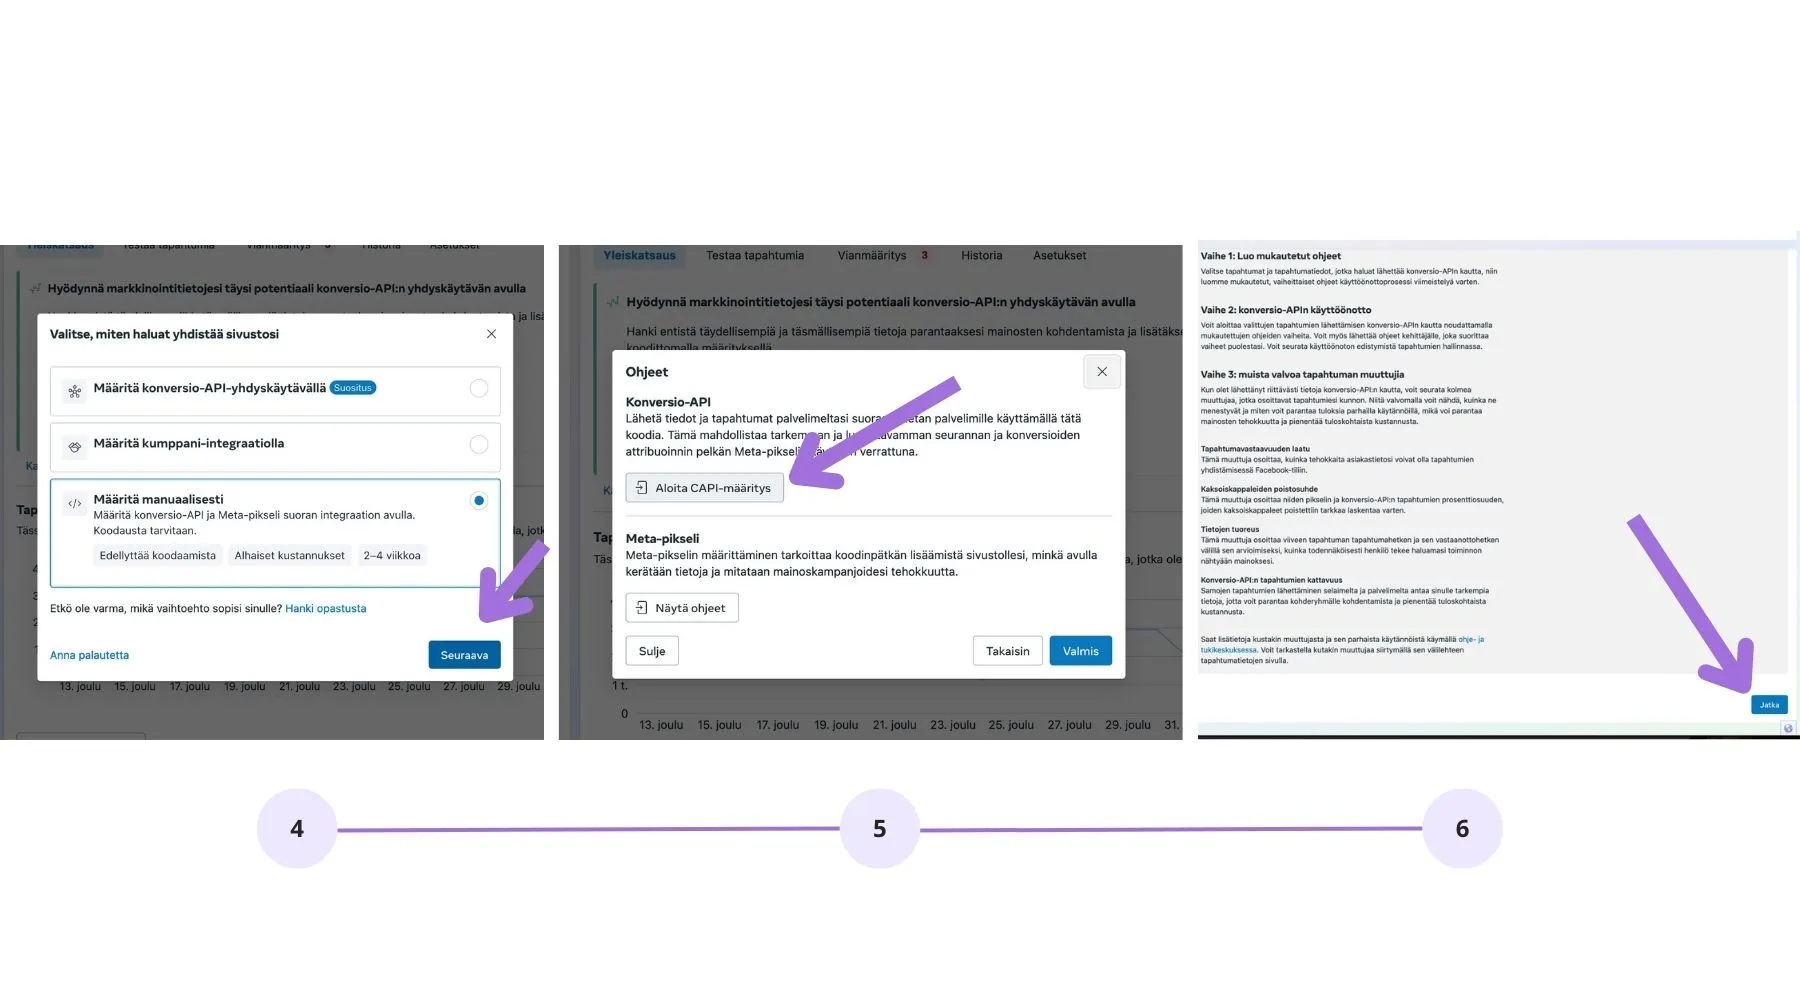
Step 2: Choose Integration Settings
Select the Manual Setup option.
Continue by clicking Next.
Start CAPI Setup by pressing the Start CAPI Setup button.
Read the instructions and press Continue.
Step 3: Configure Tracked Events
Select the events you want to track through the Conversion API, such as:
• Purchases
• Checkout
• Adding a product to the cart
• Contact requestClick Continue.
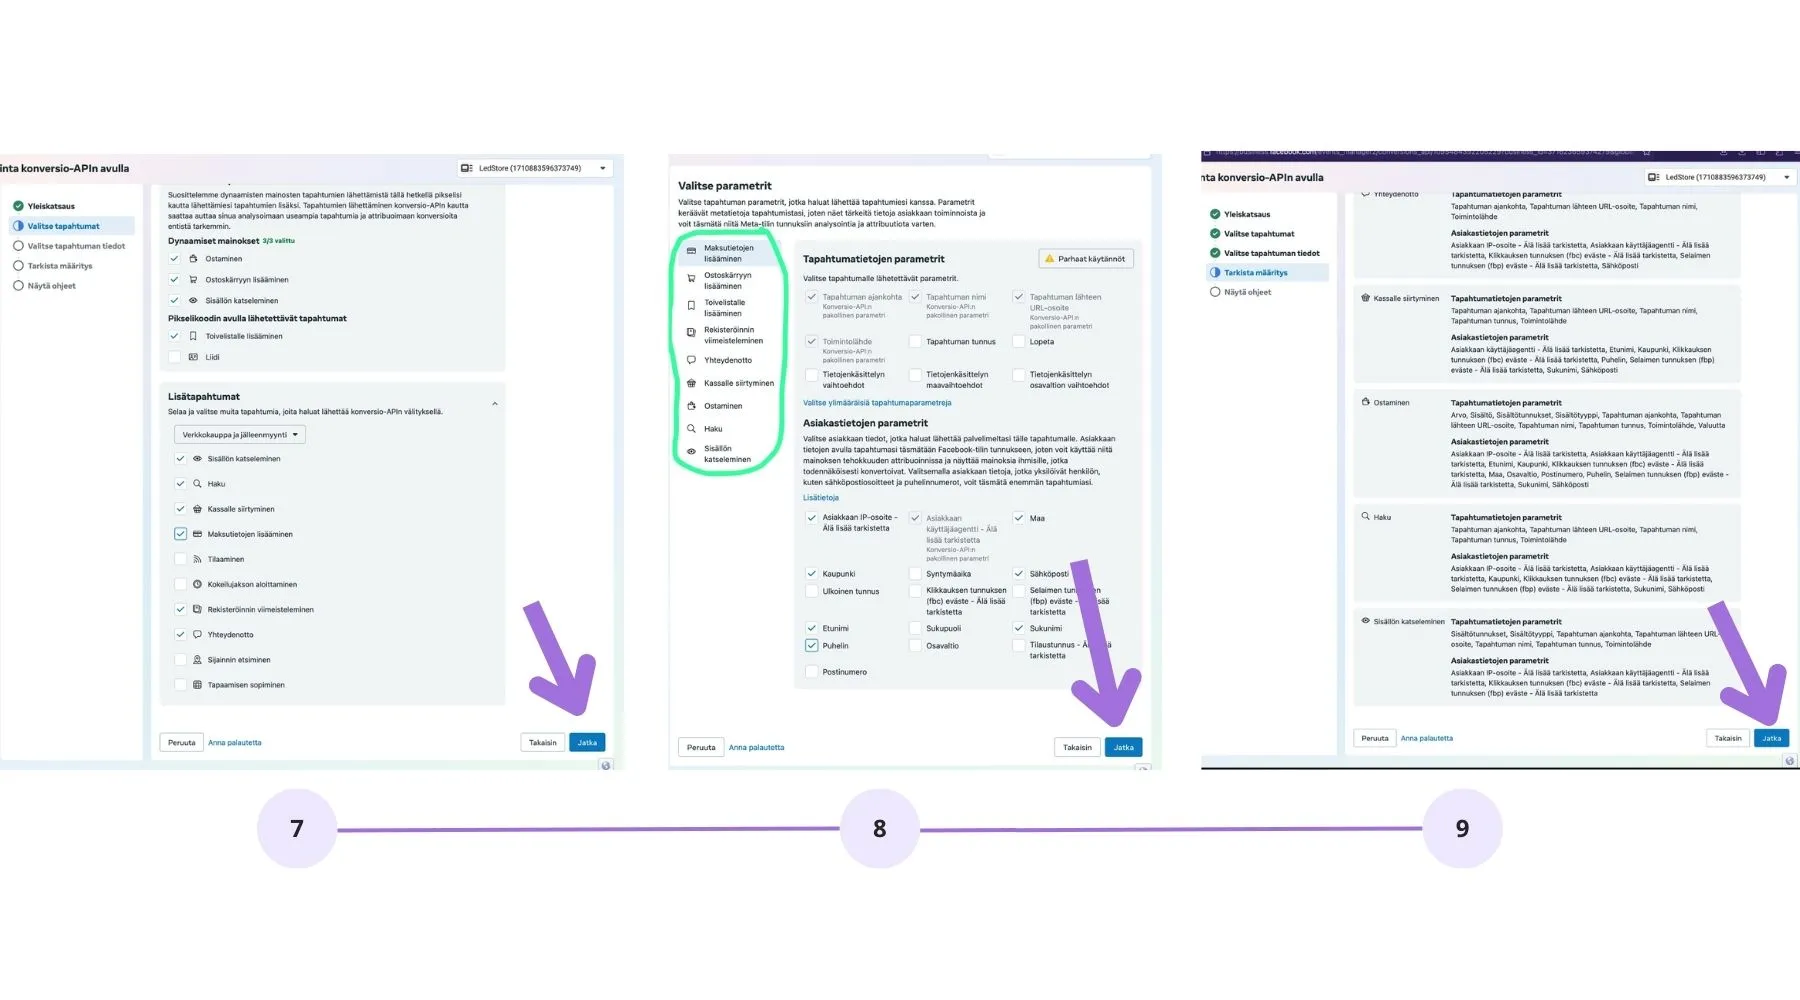
Step 4: Configure Event Parameters
Select the desired event details, such as:
• Event timestamp
• Product ID
• URL
• Customer information (secured in compliance with privacy standards)Click Continue.
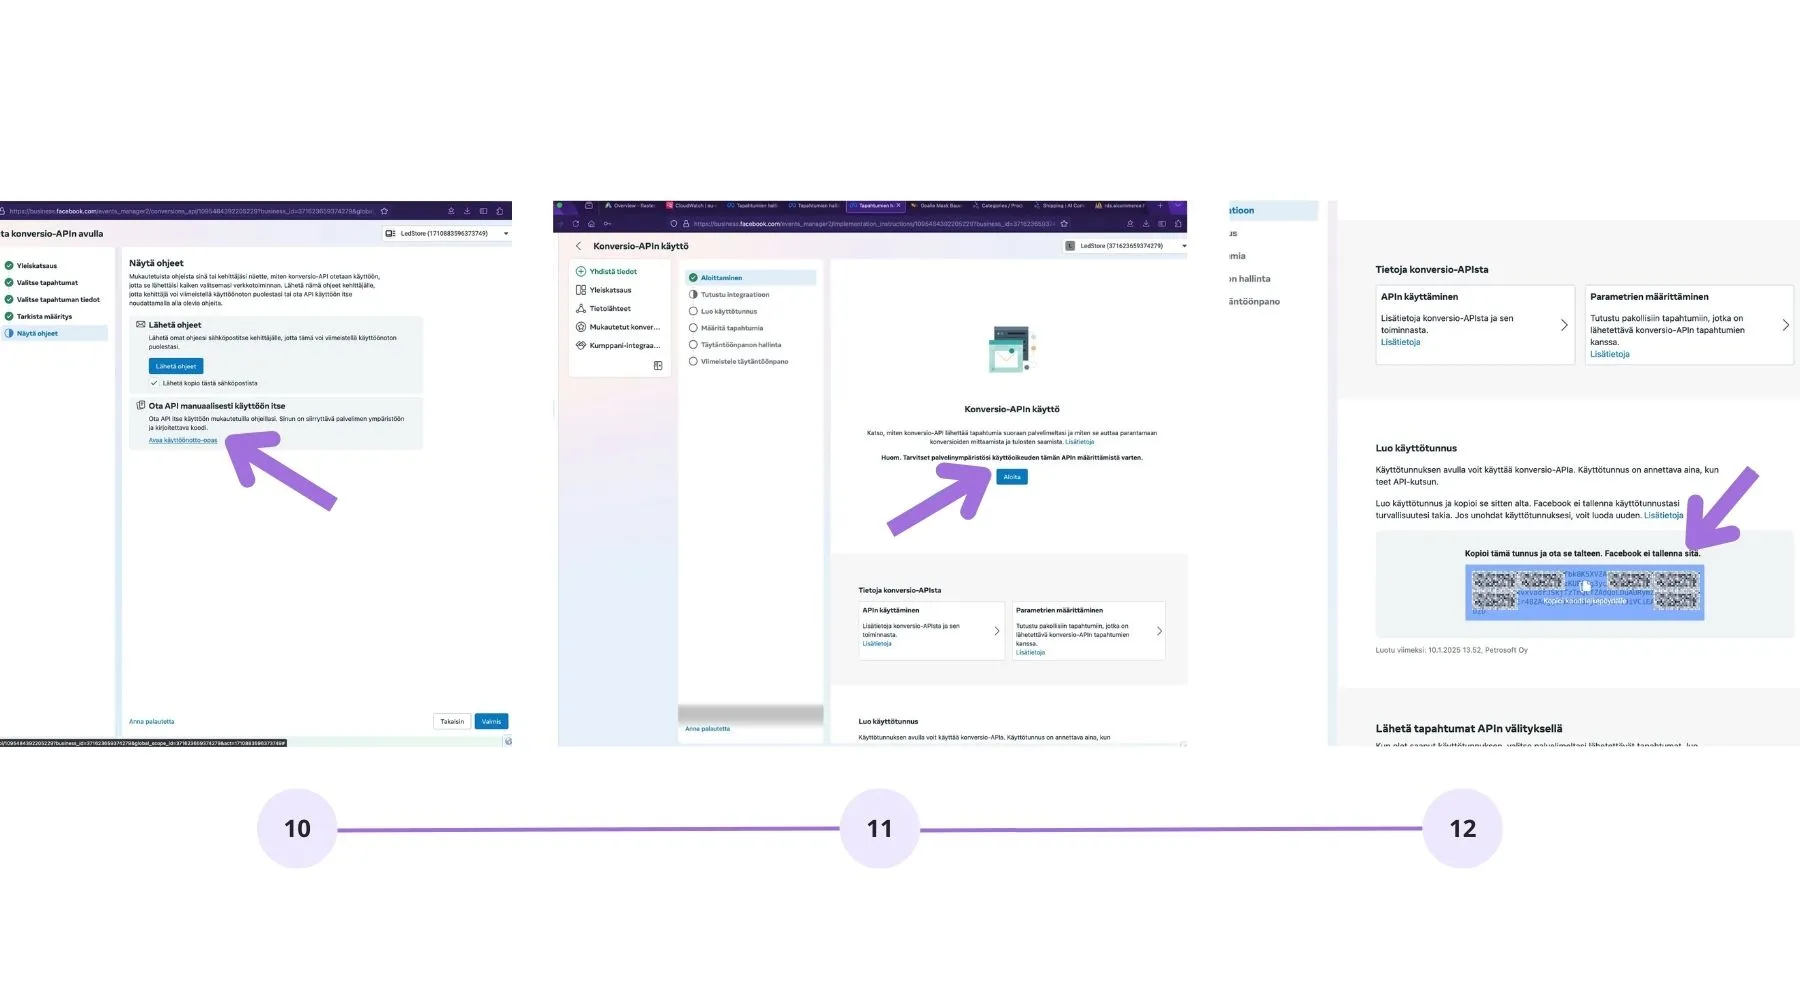
Step 5: Create Access Token
Go to the Conversion API Usage page.
Click Create Access Token and keep it safe.
Facebook will not store this token, so keep it secure.
Step 6: Add Meta API Secret in AI Commerce Dashboard
Log in to your AI Commerce online shop dashboard.
Go to Mystore -> Meta API Secret.
Paste the copied access token into the Meta API Secret field.
Save the changes.
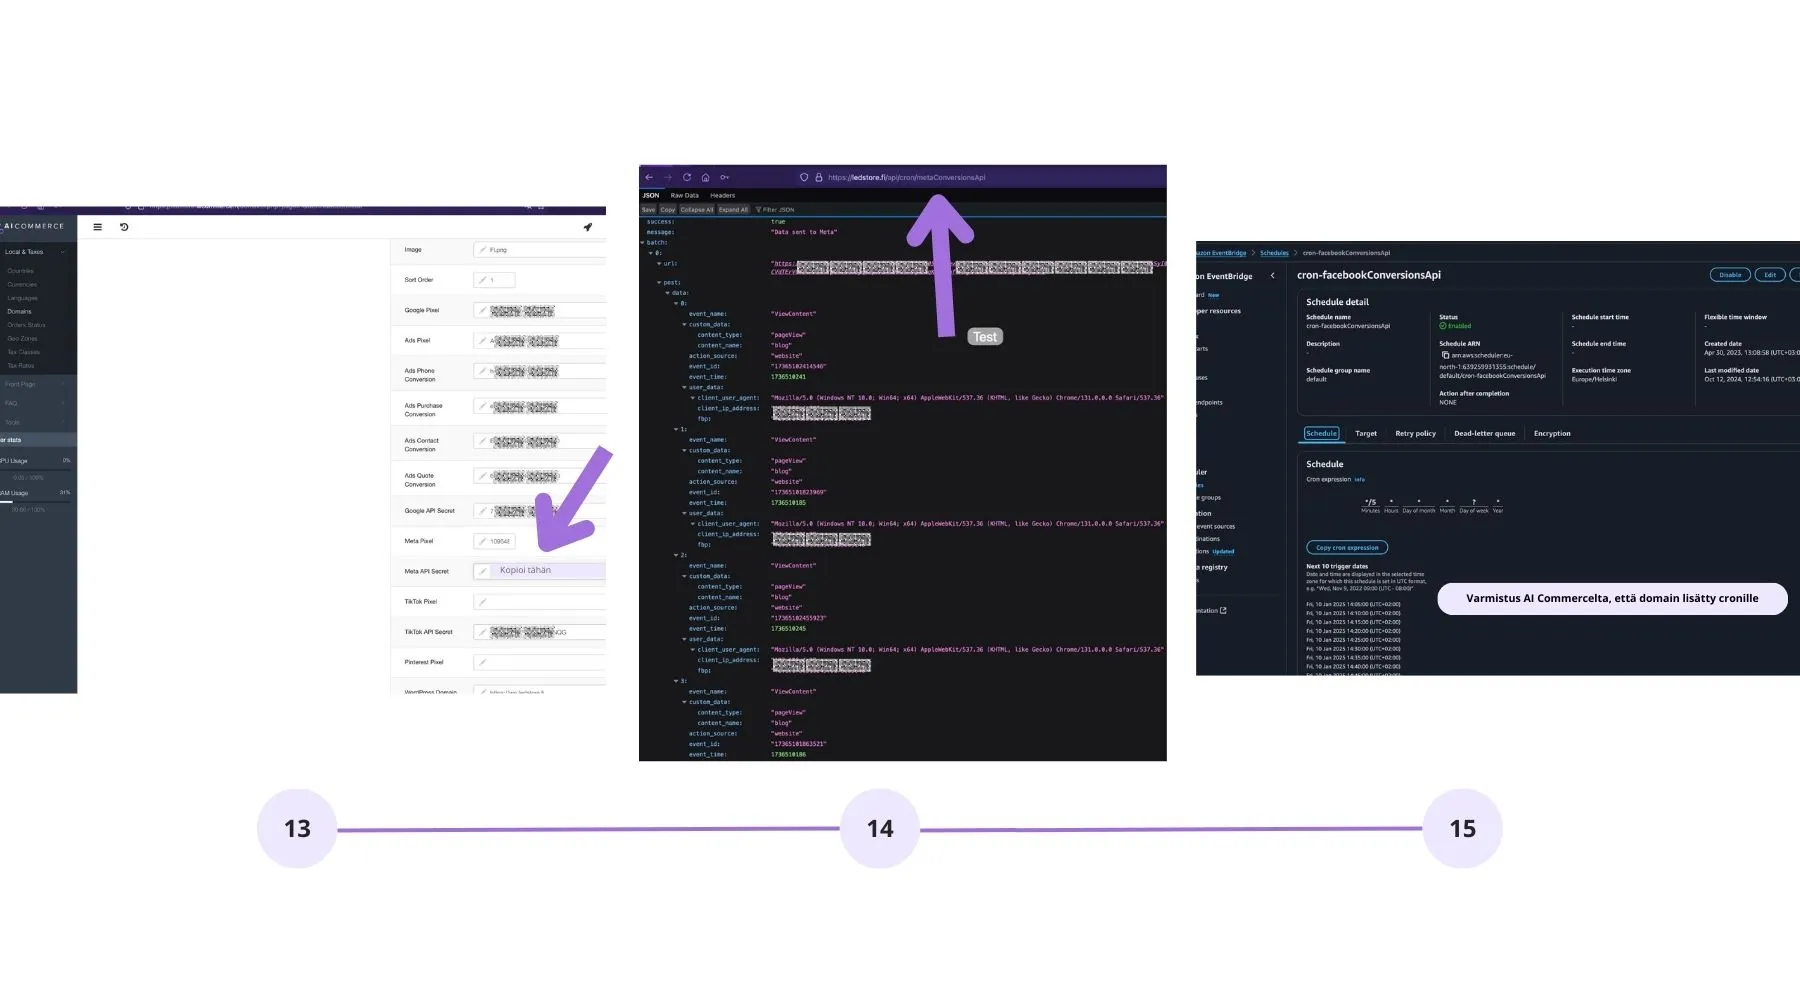
Step 7: Verify Data is Transmitted Correctly
Test the API connection by sending events in test mode.
Check that the events appear in the Events Manager section of Facebook Business Manager.
Ensure from the AI Commerce dashboard that the domain has been added to the cron job.
• Improve Data Accuracy: The API connects your online store's data directly to Meta's services without browser limitations, reducing the loss of tracking information due to issues like cookie blocking.
• Enhance Ad Targeting: The Conversion API provides more comprehensive information about customer behavior, helping to create more accurate and personalized advertising campaigns.
• Optimize Conversion Tracking: Tracking events such as purchases and registrations is more accurate and reliable.
• Improve Privacy: The API allows for management and transfer of data in a secure manner without compromising privacy.
• Increase Results with Advertising Budget: Better data leads to more effective advertising optimization and higher ROI.
Start the Conversion API integration from the following URL:
https://business.facebook.com/events_manager
Then follow the instructions presented in the screenshots to set up the Conversion API in your online shopping solution.
Step 1: Add a New Integration in Facebook Business Manager
Go to Facebook Business Manager and open the Events Manager section.
Select your website where you want to add the Conversion API.
Click Add New Integration and select Conversion API.
Click Set Up to continue.
Step 2: Choose Integration Settings
Select the Manual Setup option.
Continue by clicking Next.
Start CAPI Setup by pressing the Start CAPI Setup button.
Read the instructions and press Continue.
Step 3: Configure Tracked Events
Select the events you want to track through the Conversion API, such as:
• Purchases
• Checkout
• Adding a product to the cart
• Contact requestClick Continue.
Step 4: Configure Event Parameters
Select the desired event details, such as:
• Event timestamp
• Product ID
• URL
• Customer information (secured in compliance with privacy standards)Click Continue.
Step 5: Create Access Token
Go to the Conversion API Usage page.
Click Create Access Token and keep it safe.
Facebook will not store this token, so keep it secure.
Step 6: Add Meta API Secret in AI Commerce Dashboard
Log in to your AI Commerce online shop dashboard.
Go to Mystore -> Meta API Secret.
Paste the copied access token into the Meta API Secret field.
Save the changes.
Step 7: Verify Data is Transmitted Correctly
Test the API connection by sending events in test mode.
Check that the events appear in the Events Manager section of Facebook Business Manager.
Ensure from the AI Commerce dashboard that the domain has been added to the cron job.
Lauri Koskensalo
Head of Growth
Lauri is an e-commerce technology expert and the sales director of AI Commerce. He helps companies grow with modern solutions and enjoys discussing the development of e-commerce.
info@aicommerce.fi
You might also be interested in


Frequently Asked Questions
What is AI Commerce and how does it work?
Where does the name AI Commerce come from?
What kind of company is AI Commerce suitable for?
How long are the contracts?
What kind of pricing models are available?
Are there any separate setup costs involved in the implementation of AI Commerce?
With whom can I develop my online store?
I am considering moving to AI Commerce. How can I transfer my information?
Is technical support or guidance available to the user?
Is the software cloud-based?

GDPR
COMPLIANT
Future-proof eCommerce built in the EU
Our solution is developed and hosted in the EU, fully compliant with GDPR and other regulatory requirements. Gain peace of mind with secure data handling, reliable support, and a transparent European partner.

© 2025 AI Commerce. All rights reserved.
GDPR
COMPLIANT
Future-proof eCommerce built in the EU
Our solution is developed and hosted in the EU, fully compliant with GDPR and other regulatory requirements. Gain peace of mind with secure data handling, reliable support, and a transparent European partner.
© 2025 AI Commerce. All rights reserved.